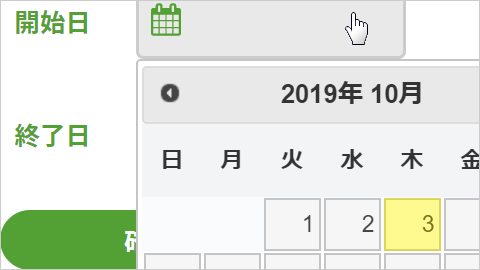
jQuery UIを導入し、Datepickerでカレンダーから日付を入力します。それぞれ開始日と終了日を分けて入力し、必須入力チェック、開始日と終了日の整合性チェックを行います。
| 開始日 | |
|---|---|
| 終了日 |
htmlのコードは下記になります。
日付はDatepickerのカレンダー選択で入力するため、直接入力できないようにinputタグにreadonly=”readonly”を付与します。またDatepickerの動作用にclass=”datepicker”を付与します。
<div class="form_section">
<table class="date-table">
	<tr>
		<th>開始日</th>
		<td><label class="cal-wrap"><input type="text" class="cal datepicker" readonly="readonly" name="start_date"></label></td>
	</tr>
	<tr>
		<th>終了日</th>
		<td><label class="cal-wrap"><input type="text" class="cal datepicker" readonly="readonly" name="end_date"></label></td>
	</tr>
</table>
<div class="btn-style"><a href="#" class="confirm-btn">確認</a></div>
</div>
続いてCSSのコードです。
labelタグの疑似要素にカレンダーアイコンのCSSを記述します。またエラーメッセージ用のCSSも用意します。
.form_section {
	max-width: 630px;
	margin: 0 auto;
	padding: 0;
}
.date-table {
	border-collapse: collapse;
}
.date-table th {
	color: #53a034;
	padding: 10px 20px 0 0;
	vertical-align: top;
	white-space: nowrap;
}
.date-table td {
	padding: 0 0 1.5em 0;
}
.cal-wrap {
	position: relative;
	cursor: pointer;
}
.cal-wrap:before {
	content: "";
	background: url(icon_calendar.svg) no-repeat;
	background-size: contain;
	height: 22px;
	width: 22px;
	position: absolute;
	top: 0;
	bottom: 0;
	left: 10px;
	margin: auto;
}
input[type="text"].cal {
	font-size: 18px;
	outline: none;
	background: #e9e9e9;
	border-radius: 5px;
	height: 50px;
	line-height: 50px;
	padding: 0 0 0 50px;
	cursor: pointer;
	width: 180px;
	box-sizing: border-box;
	border: 2px solid #ccc;
}
.btn-style a {
	background: #53a034;
	border-radius: 40px;
	color: #fff;
	display: inline-block;
	font-weight: bold;
	height: 40px;
	line-height: 40px;
	text-align: center;
	width: 100%;
	max-width: 200px;
	text-decoration: none;
}
.error_txt {
	display: block;
	margin: .3em 0 0 0;
	color: #f00;
}
続いてjQuery UI導入用のCSSファイル、jsファイル読み込み部分のコードです。
最後のjquery.ui.datepicker-ja.min.jsはDatepickerの日本語化用です。
<link rel="stylesheet" href="css/jquery-ui.min.css">
<script src="js/jquery-ui.min.js"></script>
<script src="js/jquery.ui.datepicker-ja.min.js"></script>
最後にjQueryのコードです。
input属性に付与したクラス名datepickerをセレクタにしてDatepickerを動作させます。
確認ボタンを押した時の動作は、エラーリセット、必須入力チェック、開始日と終了日の整合性チェックに分けて記述します。各処理では対象のtdタグを指定するために、直前の親要素が指定できるclosestを利用しています。また、エラーがあった場合、なかった場合、それぞれの処理終了後にreturn false;で処理を中断し、aタグのherf属性のページ遷移を発生させないようにしています。なお、開始日と終了日の整合性チェックは開始日と終了日が同じ場合はエラーになります。
$(function() {
	if($(".datepicker").length) {
		$(".datepicker").datepicker();
	}

	if($('.confirm-btn').length) {
		var error_html = '<span class="error_txt">※必須項目となります。日付を選択してください。</span>';
		var error_html_time = '<span class="error_txt">※終了日は開始日よりも後に設定してください。</span>';

		$('.confirm-btn').on('click',function() {
			var form_sec = $(this).closest('.form_section');
			var start_date = $(form_sec).find('[name="start_date"]').val();
			var end_date = $(form_sec).find('[name="end_date"]').val();

			// エラーリセット
			$(form_sec).find('[name="start_date"]').closest('td').find('.error_txt').remove();
			$(form_sec).find('[name="end_date"]').closest('td').find('.error_txt').remove();

			// 必須入力チェック
			if(start_date === '') {
				$(form_sec).find('[name="start_date"]').closest('td').append(error_html);
			}
			if(end_date === '') {
				$(form_sec).find('[name="end_date"]').closest('td').append(error_html);
			}
			if($(form_sec).find('.error_txt').length) {
				return false;
			}

			// 時間計算
			var start = new Date(start_date);
			var end = new Date(end_date);
			var diff = end.getTime() - start.getTime();
			var diff_hour = Math.ceil(diff / (1000 * 60 * 60) );

			// 開始日と終了日の整合性チェック
			if ( diff_hour < 1 ) {
				$(form_sec).find('[name="end_date"]').closest('td').append(error_html_time);
				return false;
			}

			return false;
		});
	}
});